Friday, August 2, 2013

The Midnight Unicorn

I found one of the best little books in a forgotten corner of Borders before it went out of business.  The book was called "The Midnight Unicorn" by Neil Reed.  In this wonderful story a little girl imagines that a statue of a unicorn in the park comes to life and takes her and her faithful dog on an adventure around the world.  The pages are embossed too, which makes for a neat texture link.  

After the story I showed my first and second graders how to draw the unicorn using shapes. Then we put ourselves on top of our unicorns.  We drew with Crayola Portfolio Series Oil Crayons on turquoise paper.  For the background I give the kids free rein.  They get to put themselves somewhere they want their unicorn to take them. 


Lots of kids wanted to go to the island that was at the end of the book.

This unicorn is taking her girl to an amusement park.  There's a Ferris Wheel in the bottom right corner.


This unicorn is taking his person into outer space.  Note the aliens.

This unicorn helped her person find a pot of gold at the end of the rainbow.

Oh, I'm SkippyJon Jones...

and I bounce on my bed, and once or six times I land on my head!


That is my favorite line from the the first book.  If you have no idea what I'm talking about you are missing out.  The SkippyJon Jones books are a treasure!  Written and illustrated by Judy Schachner these books are full of imagination - and one Siamese kitten who just happens to think he's a Chihuahua. I have a SkippyJon project for pretty much every single grade.  Each grade level does an illustration based on a different book in the series.  My students look forward to the SkippyJon projects.  They love this fiesty little kitten as much as I do. 

The project below is based on the first book in the series.  If you don't have the book, you can find it here.

Day One is reading the story and then doing a wet on wet watercolor painting on 9 x 12 paper.  This paper will be put aside to make SkippyJon's dress up clothes.

Day Two is doing a desert landscape.  Oil crayon on 12 x 18 sky blue paper. We blend colors and mix black and white into the brown to get mountains in different colors. 

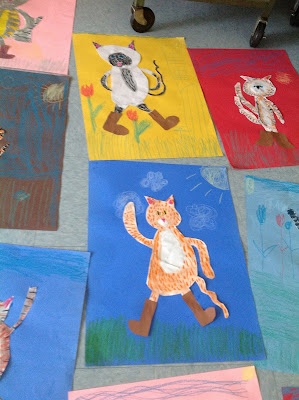
Day 3 is creating Skippyjon!  I give the kids a 9 x 12 white paper and brown paper.  I break the kitten down into shapes.  Circle head, oval body on the white,  two triangles for ears, small circle for the Siamese "mask", four ovals for the legs, and a bubble letter "J" for the tail.  Everything is cut and assembled onto the background.  The painted paper is brought back out.  A triangle for his poncho, a rectangle for the brim of the sombrero with an oval on top to complete the hat and an "8" for his mask. A couple of googly eyes and a crayon to draw the mouth and whiskers and he's finished!  Most kids will finish assembling the kitten in one class however there are always some students who will need two classes. 


Puss in Boots Modified Up and Down

Usually, for my end of the year art show I just pick a project from each class that I think the whole class did particularly well on.  This year, inspired by Painted Paper, I chose a theme for all my art show projects. 
We are doing Fabulous Fairy Tales.  Every grade is getting a different tale to illustrate.  I've been reading the various fairy tales to my classes and it is shocking and sad to me how many students just don't know them at all.  Or they only know the Disney-fied version.

For example, Puss in Boots.  None of them knew him from anything besides Shrek and the spin-off movie.  They had no idea that the reason it's funny the king hires Puss to eliminate Shrek in the second movie is because he is an ogre slayer in his own story.  They all wanted to add swords and the poofy feather hat to their cats to turn him into the one from the Dreamworks movies, rather then appreciating the cat's cleverness in his original story.  *sigh*

One of my schools is K-6.  My other building is K-2.  Rather then reinvent the wheel, I just used the same Puss in Boots plan and modified it for different skill levels. 

In one building my 5th graders created Puss in Boots using a much more realistic face and body.  We studied prints and books of cats to match coloring.  We added fur texture by using watercolor pencil to draw lines and then did a wash of water over it to spread the watercolor pencil and fill space.  Cats were cut and glued to backgrounds, boots in different styles were added, construction paper crayons created the backgrounds.  You can certainly tell my "bare minimum" students from the rest.  As a final finishing touch I let them glue sequins onto the boots for decoration.  Upon further reflection, this was a bad move on my part, as 5th grade girls can not contain themselves in the face of sparkly objects.  There were more sequins on my cart's shelves, the floor and various girls then on the boots.  Live and learn.

Here are some examples of the 5th grade work:


For first grade at my other building I kept the lesson mostly the same.  We simplified the shapes used for the cat bodies, and stuck to only one simple boot shape.  I eliminated the sequins (no way I was picking all those things up off the floor again).  We used Crayola's Portfolio Series oil crayons for the cats.  I had forgotten with first graders that you have to specify that cats don't come in pink with purple polka dots.  So the first class's work is...very fantasy based. 

The second time I taught it we looked at the cat prints and books and this time I got cats that were normal cat colors but well...I call them Frankencats.  Orange Tabby arms on a grey tabby belly, with Siamese heads, and yellow tabby legs... They are interesting to say the least.

Finally, for the next two classes I managed to get across that yes, a cat can have stripes but probably not six different colored ones on the same body.  We used construction paper crayons again for the background.  Everyone was allowed to choose what color background paper they wanted (for both 5th and 1st). 


I think if I teach this again I'll stick to the first grade or just younger kids in general.  My 5th grade enjoyed it but I feel like the level of enthusiasm was much greater for the first.  Again, one of those live and learn situations!


Jan-U-Beary Continued

Just realized I forgot to post the pictures of the model magic polar bears from my Jan-U-Beary post.  Here they are in all their mildly crooked adorableness.


Oil Crayon Animals - Drawing from Observation

Have I ever mentioned how much I love calenders?  The day after new year's when they all go on sale is one of my favorite times.  Have a lesson on zebras but no prints?  Discounted Zebra calender!  Need more examples of M.C. Escher's works?  Discounted Escher calender.  My students now know that I buy them, pull them apart and laminate them to make inspiration prints for them.  After new year's I get a flood of calenders from them.  Not all are usable content-wise, but almost all of them are useful. 

This project would never happen without those old calenders.  This is a drawing from observation lesson.  These are all 3rd grade works.  That's right, 3rd grade.  I take out the animal calenders and spred them out and ask everyone to choose their favorite animal, be it wild or domestic.  After that I pass out black paper and white chalk. 

I demonstrate contour line drawing for this.  I have them pick a spot on their animal and trace their finger around the whole outside edge of the creature to practice.  Then we use the white chalk to draw that same contour on the paper.  The nice thing about using the chalk is that you can erase it if a mistake is made and it shows up brightly against the black paper for the kids to see easier.  I have the students add the inside details once the contour is on.  Background can also be added at that time.

Typically, we spend one whole day on the initial drawing. Days 2-3 (and sometimes 4, depending on how complicated the drawing was) is spent coloring with the oil crayons.  I do a short demo for blending them, smudging, adding white or black for tints or shades, but outside of reminding them they need to try to match the colors in their calender print as much as they are able I really just turn them loose and let them have fun coloring.  I do make sure they understand that the color should be applied heavily, so that the black paper is covered up.  I love oil crayon on black paper.  The colors all seem so much richer. 

Here are some of the end results!